

Table of Contents
Cat Nail Trimming Training Complete Guide to Clipping Cat Nails Without Stress
You look at your cat’s claws and see they are long, sharp, and starting to curl slightly at the tips. You know they need a trim, but the last time you tried, your cat thrashed, bit, and escaped mid clip leaving you with a scratched hand and a cat hiding under the bed for three days. Nail trimming is one of the most dreaded grooming tasks for cat owners, and it is also one of the most important. Overgrown nails can curl into the paw pads, causing pain, infection, and difficulty walking.
📚 Recommended Cat Guides
🐱 The Trainable Cat Book
Learn proven methods to train your cat and stop unwanted behaviors.
View Book →❤️ Complete Cat Care Manual
Your complete guide to cat nutrition, health, grooming, behavior, and daily care.
Get the Manual →Long nails get snagged on fabric, carpet, and furniture, which can tear the nail painfully or even pull it out entirely. Senior cats and cats with arthritis are especially vulnerable because they do not scratch as frequently and their nails do not wear down naturally. Despite the difficulty many owners experience, nail trimming does not have to be a battle.
With the right approach, proper desensitization, and patience, most cats can learn to tolerate or even cooperate with nail trimming. The key is understanding that your cat is not being difficult. They are being scared. Their paws are sensitive, their claws are important tools for survival, and having someone grab and cut them feels threatening. Training transforms this experience from scary to routine by gradually teaching your cat that nail trimming is harmless and always followed by something wonderful.
As a certified veterinary expert and professional cat behaviorist, I have helped countless owners transform their nail trimming nightmare into a manageable routine. Some cats learn to sit calmly for trims within a few weeks. Others take longer.
All of them can get there with the right method. This guide covers why nail trimming matters, how to prepare your cat through desensitization, the step by step training process, choosing the right tools, proper cutting technique that avoids the quick, what to do if you accidentally cut too short, and the maintenance schedule that keeps your cat’s nails healthy. Nail trimming is a skill that both you and your cat can learn together, and the investment pays off for your cat’s entire life.
Why Nail Trimming Matters
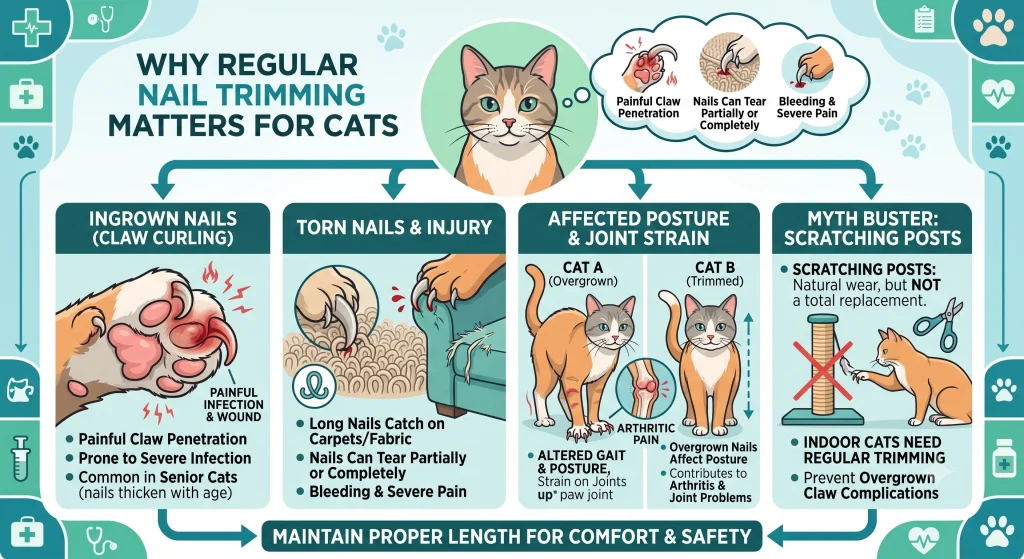
Regular nail trimming prevents several painful conditions. Ingrown nails occur when overgrown claws curl into the soft paw pad, creating a painful wound that is prone to infection. This is particularly common in senior cats whose nails grow thicker and harder with age. Torn nails happen when long nails catch on fabric, carpet, or furniture during normal movement. The nail can tear partially or completely, causing bleeding and significant pain.
Furniture damage from sharp nails is a common complaint, but the more important concern is your cat’s comfort and safety. Scratching posts help maintain nail length through natural wear, but they do not replace trimming entirely, particularly for indoor cats who scratch less frequently. Overgrown nails also affect your cat’s gait and posture, which can contribute to joint problems over time, especially in arthritic cats. Regular trimming maintains proper nail length and prevents these complications.
Desensitization Before Trimming
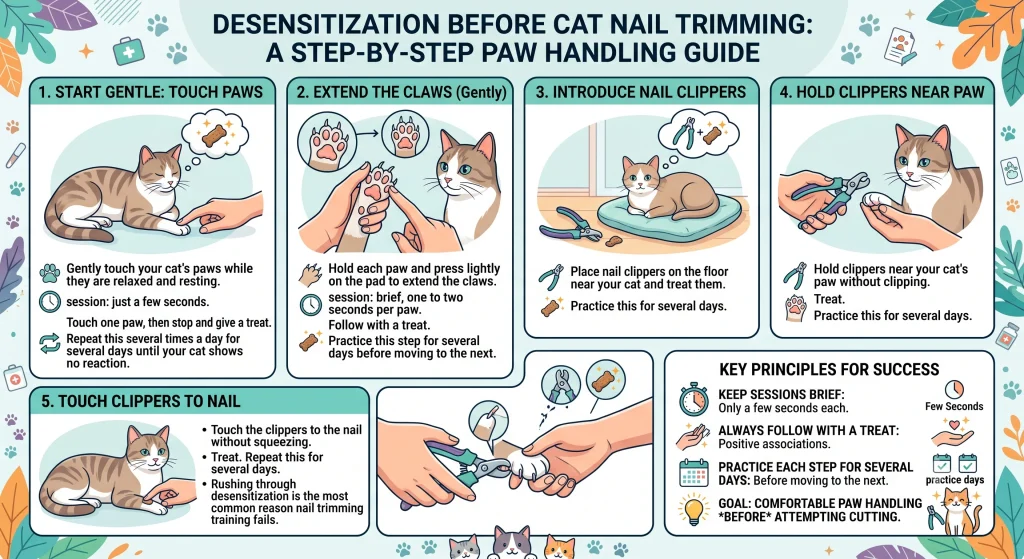
Before you attempt to cut a single nail, your cat needs to be comfortable with having their paws handled. Desensitization is the process of gradually exposing your cat to the sensations associated with nail trimming in a non threatening way. Start by gently touching your cat’s paws while they are relaxed and resting. Keep sessions to just a few seconds, touch one paw, then stop and give a treat. Do this several times a day for several days until your cat shows no reaction to paw touching.
Next, gently hold each paw and press lightly on the pad to extend the claws, just as you would during trimming. Again, keep sessions brief, one to two seconds per paw, and always follow with a treat. Introduce the nail clippers by placing them on the floor near your cat and treating them. Then hold the clippers near your cat’s paw without clipping. Then touch the clippers to the nail without squeezing. Each step should be practiced for several days before moving to the next. Rushing through desensitization is the most common reason nail trimming training fails.
Step by Step Training Process
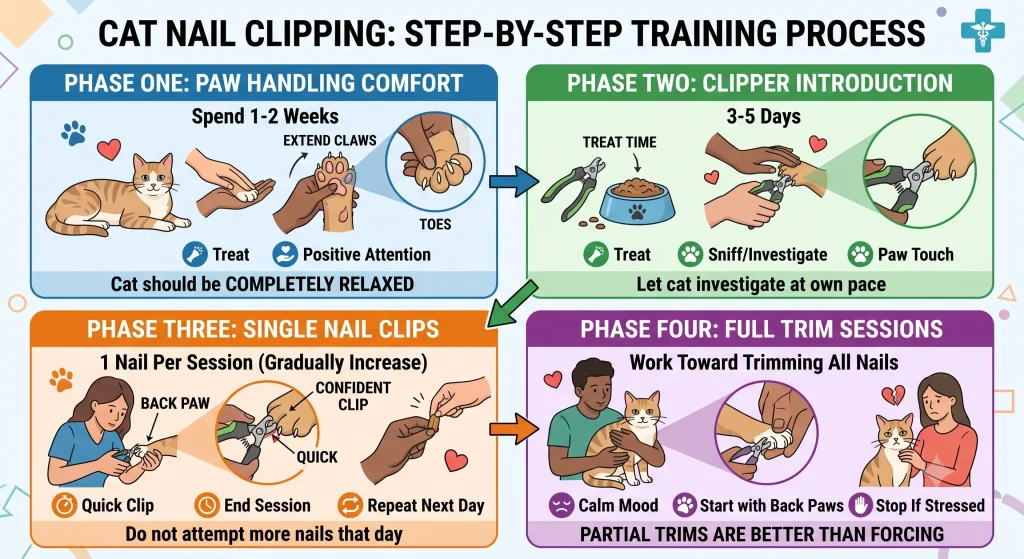
Phase One: Paw Handling Comfort
Spend one to two weeks simply getting your cat comfortable with having their paws touched, held, and manipulated. Touch each paw gently, press the pads to extend claws, and handle the toes individually. Always end each interaction with a treat and positive attention. Your cat should be completely relaxed during paw handling before you introduce clippers.
Phase Two: Clipper Introduction
Place the nail clippers near your cat during treat time so they associate the tool with positive experiences. Hold the clippers in your hand while petting and treating your cat. Touch the clippers to each paw without clipping. Let your cat sniff and investigate the clippers at their own pace. This phase takes three to five days depending on your cat’s comfort level.
Phase Three: Single Nail Clips
When your cat is comfortable with paw handling and clipper contact, clip just one nail. Choose a nail on a back paw where the quick is most visible and the cat is least reactive. Clip quickly and confidently, then immediately give a high value treat and end the session. Do not attempt more nails that day. Repeat the next day, clipping one nail per session. Gradually increase to two or three nails per session over the following week.
Phase Four: Full Trim Sessions
Once your cat tolerates multiple nail clips in a session, work toward trimming all nails in one sitting. Start with back paws, which most cats tolerate better, then move to front paws. Keep the mood calm and positive. If your cat becomes stressed, stop immediately and try again another day. It is better to do partial trims over multiple days than to force a full trim and create a negative association.
Choosing the Right Tools
Scissor style clippers are the most popular for cats because they provide good visibility of the cutting area and are easy to control. Guillotine style clippers have a hole that the nail slides through and a blade that cuts when you squeeze. They work well for thin nails but can crush thicker nails. Grinder tools, like Dremel style nail grinders, file the nail down gradually rather than cutting. They eliminate the risk of cutting the quick but create noise and vibration that some cats find frightening. Choose whichever tool you can use most confidently, because your comfort affects your cat’s comfort. Keep blades sharp, because dull clippers crush rather than cut the nail, causing pain and splintering.
Proper Cutting Technique
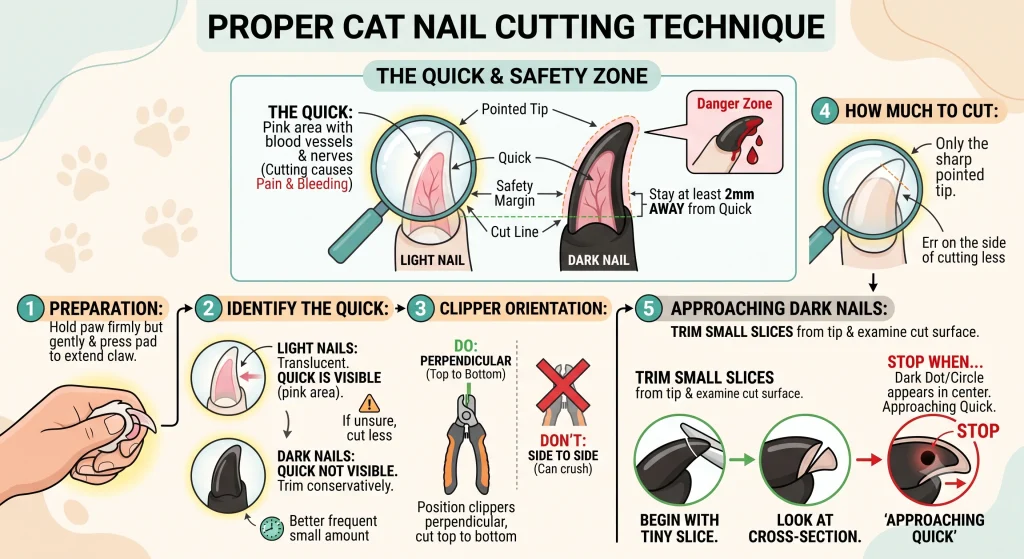
The quick is the pink area inside the nail that contains blood vessels and nerves. Cutting the quick causes pain and bleeding. In light colored nails, the quick is visible as a pink area through the translucent nail. In dark colored nails, the quick is not visible, so you must trim conservatively. Hold the paw firmly but gently and press the pad to extend the claw.
Position the clippers perpendicular to the nail, cutting from top to bottom rather than side to side. Cut only the sharp pointed tip of the nail, staying at least two millimeters away from the quick. If you are unsure where the quick starts, err on the side of cutting less. It is better to trim a small amount frequently than to cut too much once. For dark nails where you cannot see the quick, trim small slices from the tip and look at the cut surface. When you see a dark dot or circle in the center of the nail cross section, you are approaching the quick and should stop.
What to Do If You Cut the Quick
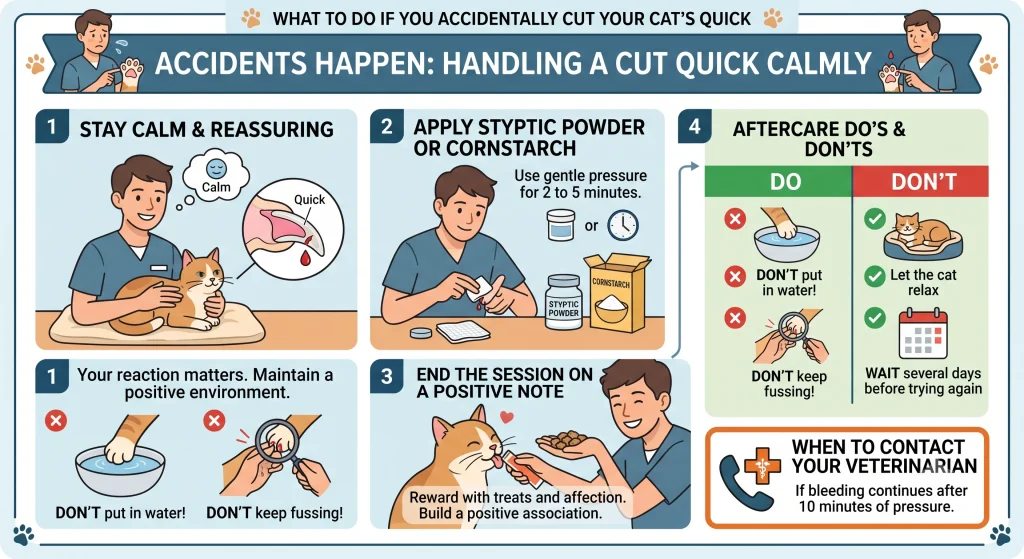
Cutting the quick happens to even experienced groomers. Stay calm, because your reaction affects your cat’s stress level. Apply styptic powder or cornstarch to the bleeding nail with gentle pressure. The bleeding should stop within two to five minutes. Do not put the nail in water or continue to fuss over it. Give your cat a treat and end the session on a positive note, even if the experience was stressful. Do not attempt another trim for several days to allow the positive association to rebuild. If bleeding does not stop after ten minutes of pressure, contact your veterinarian.
Maintenance Schedule
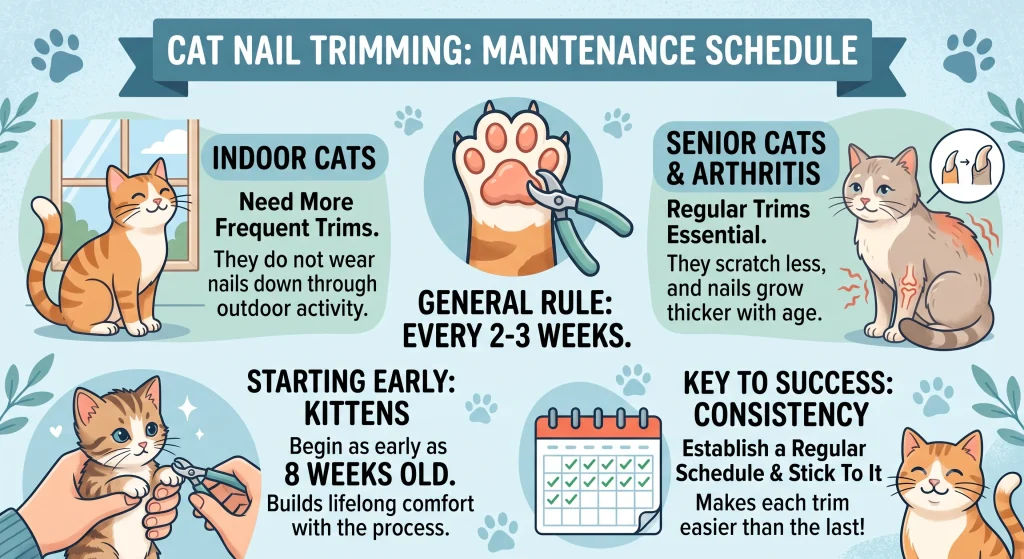
Most cats need nail trims every two to three weeks. Indoor cats may need trimming more frequently because they do not wear nails down through outdoor activity. Senior cats and cats with arthritis need regular trims because they scratch less and their nails grow thicker with age. Kittens can start nail trimming training as early as eight weeks old to build lifelong comfort with the process. Establish a regular schedule and stick to it, because consistency makes each trim easier than the last.
Expert Tips From My Practice
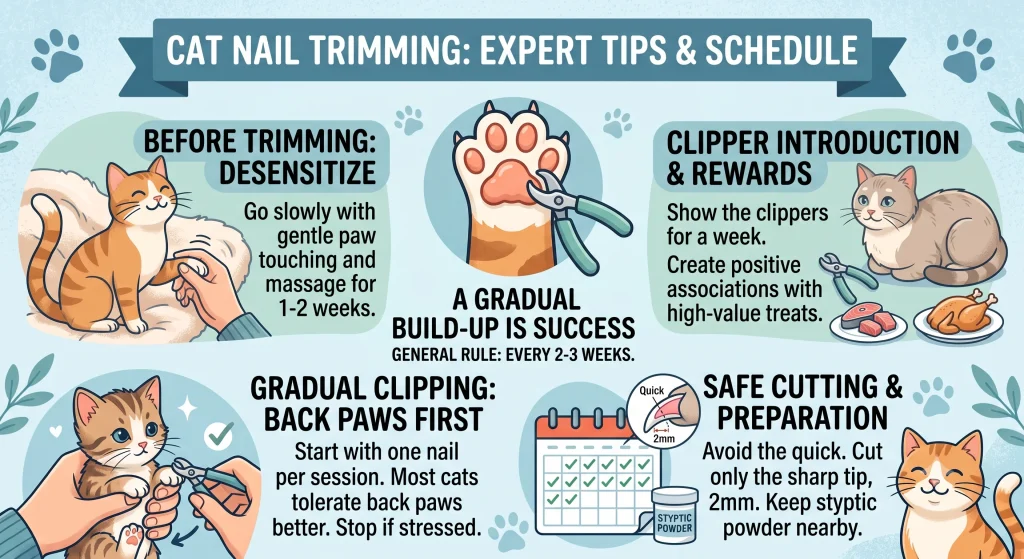
The most important advice I give for nail trimming is to go slowly with desensitization and never rush the process. I have seen owners try to trim nails immediately after adopting a cat, create a traumatic experience, and then spend months rebuilding trust before they can try again. Start with paw touching.
Do that for a week. Then introduce the clippers. Do that for a week. Then clip one nail. Do that for a week. By the time you attempt a full trim, your cat has had weeks of positive associations with the process, and the actual trimming is just the final step in a long chain of trust building. The owners who succeed are the ones who invest in desensitization upfront rather than trying to force the trim immediately.
- Desensitize before trimming. Spend one to two weeks getting your cat comfortable with paw handling first.
- Start with one nail per session. Build success gradually rather than attempting all nails at once.
- Stay away from the quick. Cut only the sharp tip and leave at least two millimeters of safe nail.
- Keep styptic powder on hand. Accidents happen, and being prepared reduces stress for both of you.
- Use high value treats. Trimming deserves the best rewards, not ordinary kibble.
- Trim every two to three weeks. Regular maintenance prevents overgrown nails and makes each trim easier.
- Back paws first. Most cats tolerate back paw trimming better than front paws.
- Stop if your cat is stressed. Partial trims over multiple days are better than forcing a full session.
FAQ
How often should I trim my cat’s nails?
Most cats need nail trims every two to three weeks. Indoor cats may need more frequent trims because they do not wear nails down through outdoor activity.
What happens if I cut the quick?
Apply styptic powder or cornstarch with gentle pressure. The bleeding should stop within two to five minutes. Stay calm and give your cat a treat.
Can I train an adult cat to accept nail trimming?
Yes. Adult cats of any age can learn to tolerate nail trimming through gradual desensitization. The process may take longer with cats who have had traumatic trimming experiences.
What nail clippers are best for cats?
Scissor style clippers are most popular for cats because they provide good visibility. Choose whichever tool you can use most confidently and keep blades sharp.
How do I trim dark colored nails?
Trim small slices from the tip and look at the cross section. When you see a dark dot in the center, you are near the quick and should stop.
Should I trim my senior cat’s nails?
Yes. Senior cats need regular trims more than younger cats because their nails grow thicker and they scratch less due to arthritis or reduced activity.
Can I use a nail grinder instead of clippers?
Yes. Nail grinders file the nail gradually and eliminate quick cutting risk. Some cats tolerate the vibration while others find it stressful.
What if my cat completely refuses nail trimming?
Go back to paw handling desensitization and progress more slowly. If your cat remains extremely resistant, ask your veterinarian or groomer for assistance.
Do kittens need nail trims?
Kittens have very sharp nails that can scratch during play and handling. Trimming kitten nails every two to three weeks protects family members and builds lifelong comfort with grooming.
Should I trim one paw at a time across different days?
Yes, especially when starting out. Trimming one or two paws per session over multiple days is better than forcing a full trim and creating negative associations.